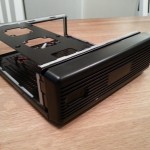
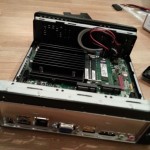
With various digital devices in the house and a need to manage how various content (photos, videos etc.) is stored, backed up and also shared (ideally externally), I’ve been wanting to get a NAS for a while.
Having ruled out leaving a normal workstation PC running (as my old desktop workstation based on a dual-core Intel Core2 6600 consumes around 100W idle, 120W under load – wastes far too much power), originally I planned to buy an off-the-shelf NAS. Recommendations from friends and colleagues included QNAP and Synology (e.g. DS213). However, I realised I’d like to have the flexibility to be able to use the NAS as I liked, running for example a webserver with applications such as Zen Photo, rsync with remote storage, use for a OneWire network etc. Whilst the Synology NAS line comes pretty close in terms of flexibility with the ability to install external apps and have access to the underlying OS, if you start hacking too much then there isn’t much advantage over running a standard OS, so I wondered whether it would instead be possible to build a decent generic x86 server which is a close match in terms of size and power usage.
Base requirements were:
- As physically small as possible, ideally shoebox size or less
- As low power as possible as it will be on 24×7.
- Must be able to take at least 2 disks, for RAID1. 2.5″ disks preferred for power utilisation reasons.
- Enough power to handle storage serving, run a webserver and misc. services (e.g. ownCloud) and also do some occasional heavier tasks like video transcoding
- Must be very quiet
Researching the parts
Some of the solutions I considered:
- An off-the-shelf mini server, e.g. a HP ProLiant Microserver, recommended by a colleague. More or less a full-featured server, with the niceties that follow. However, a little large and potentially quite high on power consumption – specs say 72-80W loaded with 4 disks.
- A Raspberry Pi with USB disks. Potentially a nice solution, especially with an idle power consumption of around 3W, but a bit clumsy with a couple of USB disks hanging off it and maybe a bit underpowered when it comes to running multiple services, transcoding etc.
- Some kind of mini-ITX server
I settled on researching the mini-ITX option. There are a huge array of chassis/motherboards on the market; some key vendors in Europe seem to be LinITX (UK), mini-itx.com (UK) and mini-itx.se (Sweden).
As a newcomer to the mini ITX world, some key points I learnt whilst researching:
- Some motherboards accept DC power via a normal ATX connector (typically from a normal built-in PSU – either standard ATX size in larger cases, or SFX in smaller cases), whilst others actually offer a simple round one-pin connector for use with an external PSU
- Cases vary a lot regarding inclusion of power supplies, and if you choose a motherboard with a “DC” (round, external) power connector then you don’t need a case with space for a PSU.
- In addition to “standard” motherboards with socket-based CPUs, motherboards with soldered-on Intel Atom or AMD Fusion CPUs are available.
- Although newer Atom CPUs support 64-bit OSes, some motherboard vendors disable this for no clearly discernible reason. Intel motherboards avoid this problem.
- Most Atom motherboards have at most 2 SATA connectors, which rules out building machines with e.g. an OS disk plus two data disks
The Intel Atom low-power CPUs seemed like a good compromise between power consumption and processing might. The most efficient are the latest generation Centerton S12xx CPUs, however at the time of writing the only motherboard I could find available was the Supermicro S9XBAA-F. However, the Atom Cedarview N2600/N2800 CPUs also have very low power usage and I came across the Intel DN2800MT motherboard which seemed like a good solution as it can also run fanless. The close second for cases that have a built-in PSU was the Intel D2700DC.
After looking at various chassis including almost buying a CFI A2060, I came across the M350 Universal Mini-ITX Enclosure which is about as physically small as a case can be whilst having room for an ITX motherboard and two 2.5″ disks. It’s also designed for fanless operation, although has spaces for fans. This seemed perfect so I ordered one from mini-itx.se together with a 60W external “brick”-type power supply.
Final main component list:
- M350 chassis
- Extra disk frame for M350 chassis
- Kingston 2GB memory SODIMM
- Intel DN2800MT motherboard
- 12V 60W stabilised power supply
- 2 x Seagate SpinPoint M8/ST1000LM024 1TB 2.5″ disks
Building the server
Having not built an ITX server before, I was a bit unsure how easy it would be given the small space. However, since the motherboard has embedded CPU and heatsink, a lot of the normal messing around with the CPU/heatsink/thermal paste/CPU fan was skipped. Installing the motherboard was as simple as clicking in the backplate (2 supplied with the board: half height and normal; normal fits the M350), sliding in the motherboard and screwing it down.
The drives screw to detachable frames which sit across the top of the chassis (one included; I bought an extra since I wanted two drives).
A single screw secures the chassis lid, which slides off. Neat.
Challenges/tips:
- The clearance between the connectors on the hard disks and the metal frame that the disk is screwed into is basically zero. So there’s no chance of using the supplied power lead with the motherboard, which is a single power lead with a SATA power at one end (to connect to the motherboard), and then two SATA connectors plus a Molex connector inline; the wires coming out of the top of the connector have nowhere to go. Even the right angle connector at the end has too much bulk. So, I bought a SATA power Y-splitter and attached it to the end of the included power cable, which works, although it means I have a lot of power cabling crammed in the case – I ideally need a SATA power Y-splitter which plugs directly into the board rather than into the cable.
- There is very little space for cabling, so use as short SATA data cables as possible (I used a couple of 20 cm types). Again, they need to have straight rather than right-angle ends.
Annoyances
- The chassis did not come supplied with any screws for the drives (even though I bought an extra disk frame). I don’t know whether this is just a mistake since every chassis I’ve bought before has come with plenty of screws/spacers etc.
- The chassis has a power light and a power button, but no disk activity light which is a weird and irritating omission. Just 1 tiny LED would do!
Firing it up
Turning on the server, everything seemed fine with the only noise being the two disks – a quick check in the BIOS showed that the disks were recognised and I also checked the CPU temperatures for a while to ensure they weren’t going sky high.
I installed Red Hat Enterprise Linux 6 from a simple boot image on a USB stick, installing the rest over the network via HTTP. All the hardware was detected without problems, and I configured Linux software RAID on the two disks
Having booted into the OS, my first stop was to ensure it didn’t overheat, so I installed lm_sensors. Running sensors-detect correctly found the sensors to detect CPU core and DIMM temperature. A replacement lm_sensors DN2800MT config file from the upstream lm_sensors site improved the display of sensor outputs slightly.
Sitting idle, the CPUs held steady at just over 40°C.
I then ran a load loop to keep all 4 cores busy for a while whilst monitoring the temperature. Even after running at full load for an hour or so, the core temperatures didn’t exceed 67°C which is fine, and pretty good without any fans!
Whilst doing this I also had the server plugged into an electricity monitor and was extremely happy with the results. Runs at 12-13W idle, and with full load only 14-15W. 12-13W for a full featured x86 server with two disks is amazing and exceeded my expectations!
Next step is to set up the software side…
[UPDATE: See Linux NAS media sharing with DLNA: ReadyMedia/minidlna for some information about sharing media with DLNA]
[UPDATE: See I/O performance of self-built low-power Linux home NAS for some performance information]

